Ordering a Sump
You must make a series of decisions for your next sump order to meet your specific needs. The following Q&A should help cover most points, but feel free to ask me for additional help via email if you wish.

How large should the sump be?
The bigger, the better. The larger your sump, the more water volume you’ll be adding to the total system, plus it will be able to hold excess water during a power (or pump) failure. No floods equals no wet flooring!
How do I decide the size?
Look at the area within the stand, taking note of any obstructions that are part of the construction of the stand. Note the hinges as well, as they can become a problem. How will you insert the sump? Through the front opening, or perhaps the rear? You may be able to remove the “style” (the upright piece of wood) from the front using a square-head screwdriver, giving you full access to drop in the sump.
Once you determine the area of space available, figuring out the length of the sump is pretty easy. Keep in mind that you may need to set aside space for a reservoir of fresh water to replace water lost due to evaporation, or perhaps a future Calcium or Kalk reactor.
The width of the sump should be the space from the front of the stand to the back, less 1”. Leave yourself a little room to adjust the sump into position.
Height is varied, but typically 16” is plenty. If the sump is too tall, it is very difficult to access things such as pumps, heaters, probes, etc. It might make it impossible to insert a skimmer in a tall sump, as there is only so much room under a tank. 16” tall works nicely, usually providing at least 10” of space to manipulate things. If you plan to implement a refugium, you’ll need to leave room for a light as well.
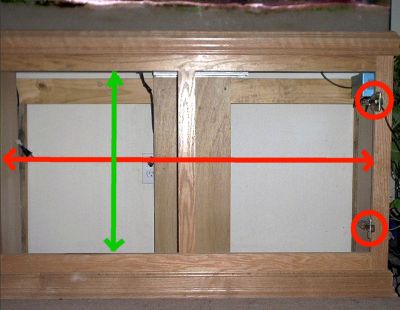
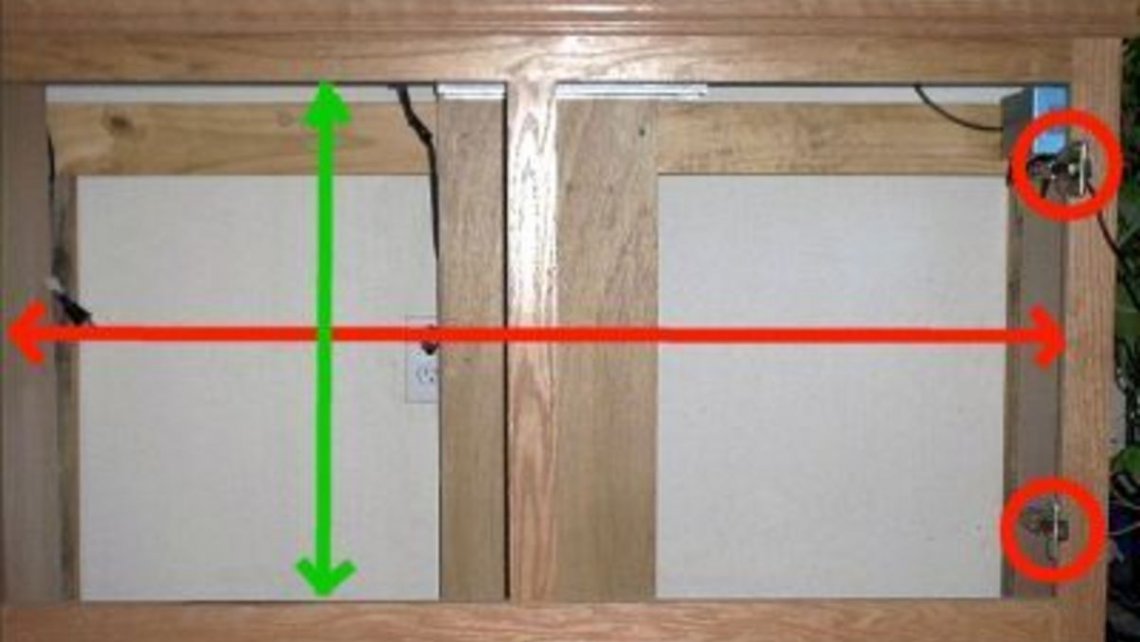
Measure the opening's length (red), height (green) and take note of obstructions (hinges as circled)
The center 'style' was removed to allow a large sump to be installed.
How do I determine the size of each section or compartment?
Leave enough room for the skimmer and pump, by obtaining the "footprint" size of the skimmer. Find out how deeply the skimmer can sit in water, according to the skimmer’s manufacturer.
The refugium needs to be large enough to grow macro algae and hold some live sand, but it doesn’t need to be huge.
The return section needs to be big if possible. This section varies due to evaporation, so the more water volume it holds, the longer you can be away from your tank and still have enough water to avoid burning up the return pump. It should be large enough to run for two or three days unattended. If space is at a premium, an automatic top-off system with a float switch will protect against evaporation issues.
How tall should the baffles be?
Once the water depth for your skimmer has been ascertained, the baffle height can be set accordingly. If the skimmer needs shallower waters, I still recommend making the skimmer zone deep. By having more water around the skimmer, it allows the bubbles time to rise and pop, so they won’t end up in the display tank. Put the skimmer on a short stand so it still meets manufacturer’s recommendations. Make sure that the skimmer sitting on a stand will still fit within the cabinet area and permit removal of the collection cup!
Average baffle height is 9 to 10”.
How wide should the bubble trap be, and how high off the bottom is the middle baffle?
1” of space between baffles, with the middle baffle 1” off the base of the sump. 1.5” - 2” works fine as well. A carbon tray can be incorporated between the baffles if desired.
How deep should the refugium be?
12” works nicely, because 2” of sand takes up some space. The baffle should be 13” or 14” tall, with teeth cut 1.5” (vertically) along the top edge. The teeth prevent the macro algae from going into the next compartment, and helps keep snails in the refugium.
What is the best layout?
There are a number of ways to configure the compartments, including some comments:
Skimmer > Refugium > Return
-
- This is a simple layout that keeps the water flow going in one direction. One objection often voiced is that “you don’t want to skim out the nutrients in the water going to the refugium.” This isn’t possible to do, unless every drop of water had to go through the skimmer to get into the refugium. Most of the water runs right past the skimmer! Even with a very weak return pump, the water pumped into the skimmer is only a portion of the body of water traveling into the next compartment.
- Benefit - all baffles are the same height
Skimmer > Return < Refugium
-
- In this situation, the two outer compartments receive their water from two sources (or one supply line that has been split), and pour into the central compartment.
- Benefit - Refugium wall can be taller, and the amount of water flowing through it can be controlled with a ball valve. This is the one I recommend most.
Refugium > Skimmer > Return
-
- This is a bad idea in my opinion, because the micro fauna (copepods, amphipods and more) that you hope to send up to your display tank as food are going to be skimmed out of the water before they ever reach the Return zone. If this is your layout, have the refugium drain via PVC pipe directly into the Return zone, bypassing the skimmer zone.
- Benefit - none.
What kind of acrylic and glue do you use, and where do you buy them?
¼” Acrylite FF for most applications. The glue is a product called Weld-On, that literally melts the two pieces of acrylic into one piece, forming a very strong bond. Weld-On #3 is fast drying (less than 60 seconds), #4 is slower (less than 5 minutes), and #16 is for patching.
#3 and #4 need a “needle applicator bottle,” and #16 needs a nozzle for better control (found at most hobby shops). I use a glass turkey baster to suck up #3 or #4 (from the can) when filling the applicator bottle.
These products can be found at Regal Plastics in Texas. Check the Yellow Pages for “plastics” to find a vendor in your area.
Do you have any further suggestions?
- Where the water enters the sump, use a small container filled with LR rubble to break up the bubbles and keep salt spray to a minimum.
- Plan in advance where you want to put a light in the stand for the refugium, making sure nothing is in the way.
- Make sure the sump doesn’t block access to power outlets (receptacles).
- Plan on putting a fan over the sump during the hotter months. Leave some space, and figure out how it will be mounted.
- Turn the skimmer’s output away from the next zone, so the micro bubbles will have to go around the skimmer before entering the bubble trap. Longer contact time in the water forces these to rise and pop.
- Avoid any sponges, pads, or socks - unless you plan to clean these out very often. Weekly rinsings might still be insufficient, and nitrates will rise unless you are meticulous about cleaning these out.
- Running carbon actively can be beneficial, but just throwing a bag of carbon in the sump won’t do much. That is called “passive” filtration, as little water will have contact time with the carbon. It must pour over and through the carbon continuously to do any good, and even then it only lasts for a duration and must be replaced. If you choose to use carbon, plan on doing so for a specified amount of time each month, like 48 to 72 hours continuously.
- To avoid any pressure point contact that might lead to failure of the sump‘s seams, be sure to put a piece of rigid foam underneath the sump. A 4’x8’ piece of foam can be purchased at Lowes or Home Depot for $12, and is easily cut with a utility knife. Don’t skip this step because this simple solution greatly reduces the risk of a leak.